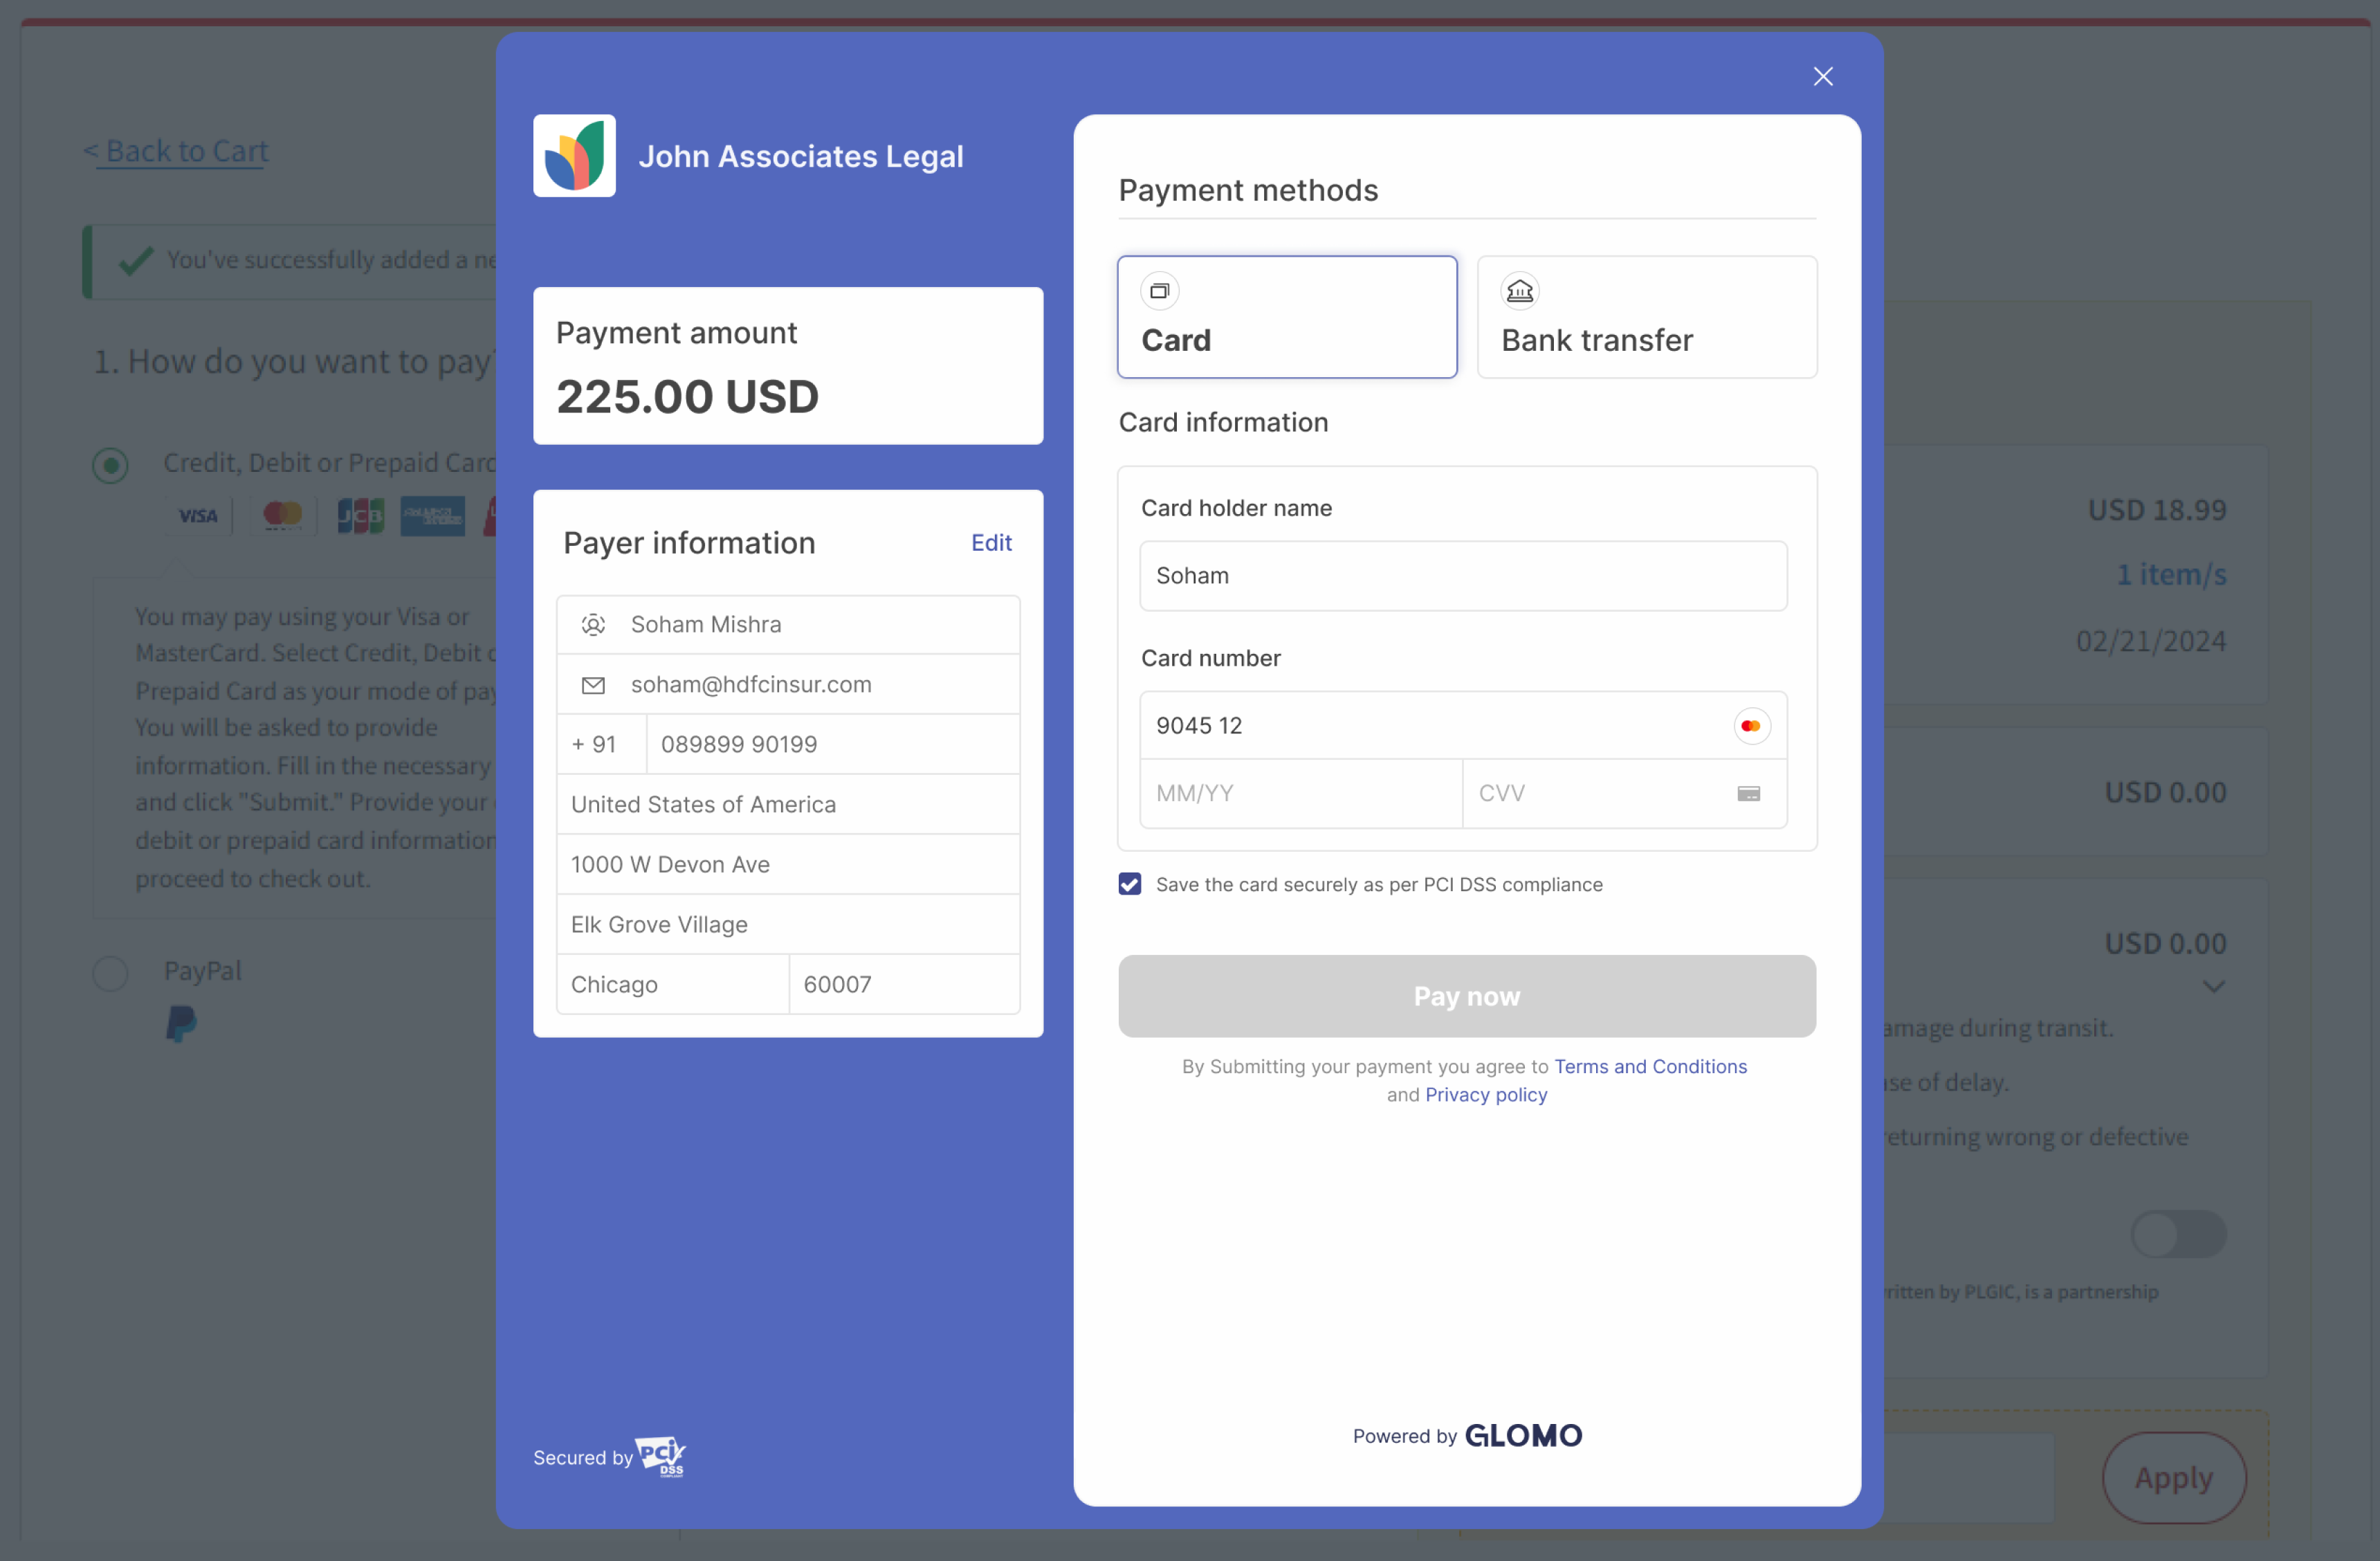
Glomo Checkout offers a prebuilt payment form that enables businesses to securely accept payments online. With its built-in features, you can minimize development time and streamline the payment process. Embed Checkout directly into your website, or direct customers to a Glomo-hosted payment page to start accepting payments.
Checkout requires minimal coding because of its prebuilt functionalities and customization options. You can integrate Checkout by creating a Checkout Session and collecting the customer’s payment details.
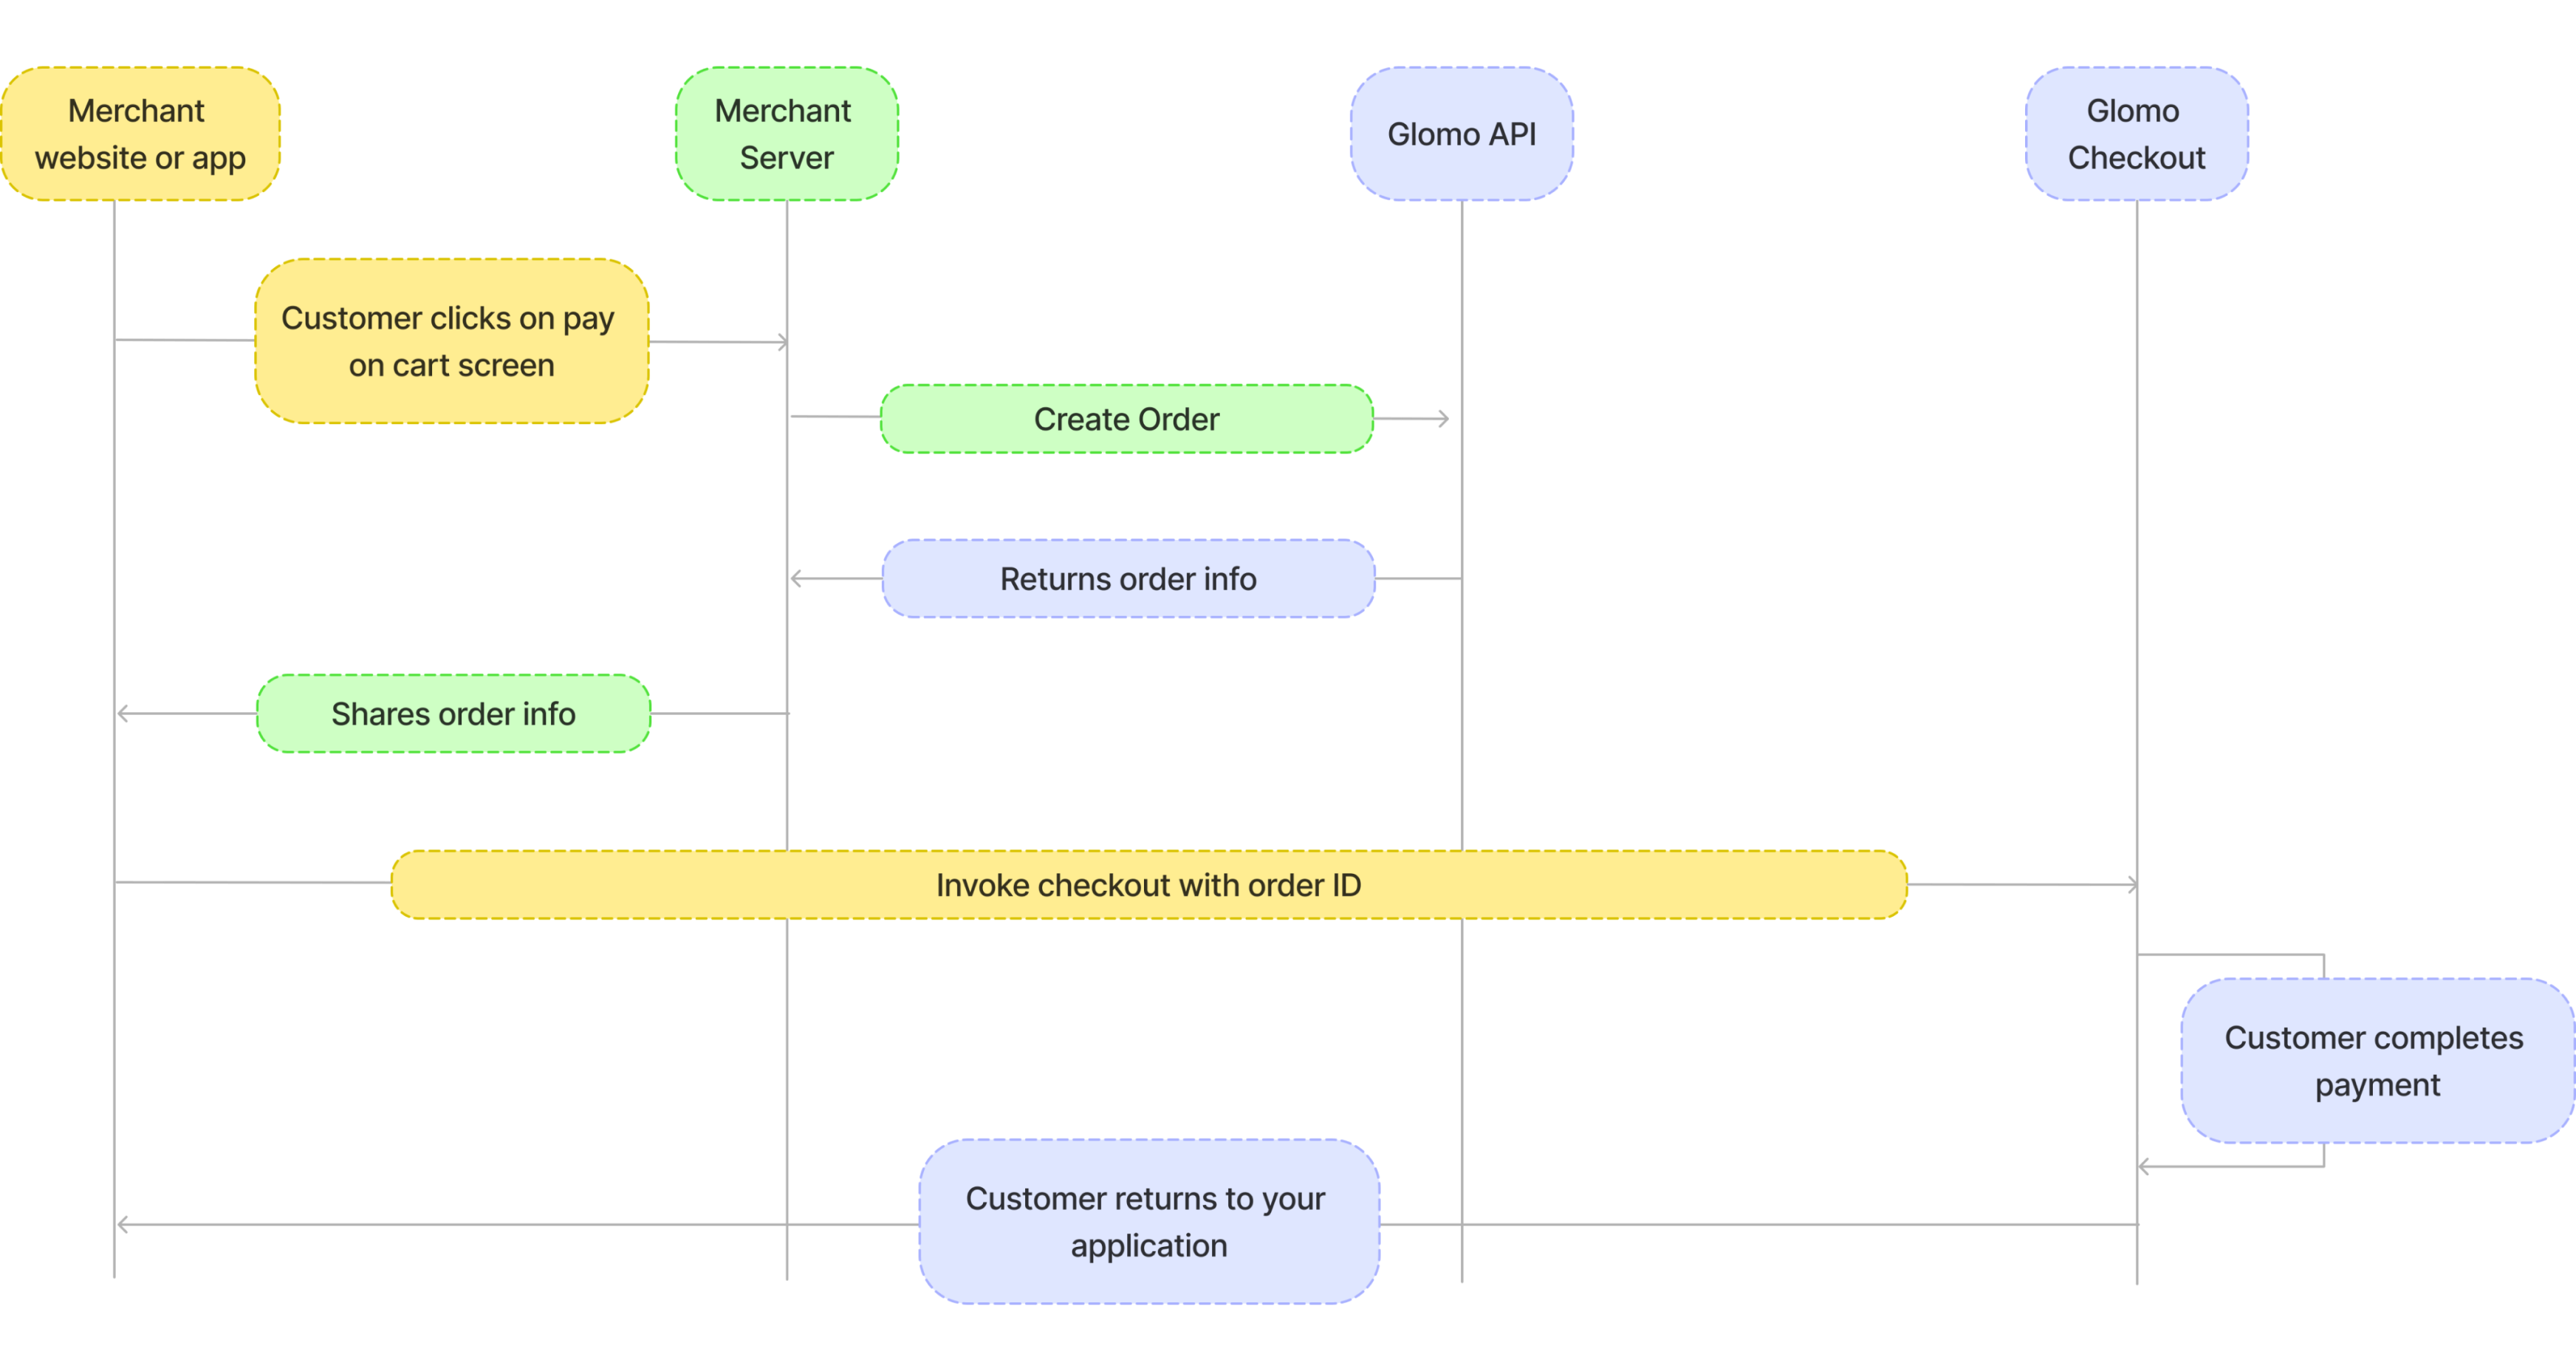
Below are the steps that are to accept payments :-
Once the customer initiates payment on the merchant’s website - Create an order by making server to server call
Use order ID to involve the checkout form
User selects a payment option on checkout and enters relevant information - Collect Payment details
Glomo authenticates the payment information
Verify Payment status returned and redirect the user to the payment confirmation page
A visual representation for the sequence of steps is given below :-
Note: We recommend using ES module imports for the Glomo Checkout SDK. While UMD format is still supported for legacy compatibility, it is not actively maintained. For optimal performance and future support, please use ES modules. If you absolutely require UMD format, please contact our support team for assistance.
1. Create an Order in Server
- You will have to create an order from your server using the secret keys.
- You can get the secret key on your glomopay dashboard.
- You can create order by integrating our Order APIs.It should be a server side api call. Refer Authentication for details around how to authenticate Order's API.
- The
order_idreceived in the response should be passed to the checkout. This ties the order with the payment and secures the request from being tampered.
2. Add payment button on client
- Add a buy button on your website.
- You can integrate the checkout by adding the below code snippet to your website.
- The code snippet will create a checkout instance and open the checkout form when the user clicks on the buy button.
- The
orderIdof the order created via your server in step 1 should be passed to the checkout instance. - The
publicKeyrefers to the public key of your glomo account present on your dashboard. - Handle the payment success and failure events, in the handlers function you will get payment object or error object based on the payment status. Collect these and send them to your server and retry accordingly in case payment failed.
- For bank transfer payments, a
payment.bank_transfer_submittedevent is emitted when the user submits their payment details on the checkout. This event only indicates that the user has submitted payment details; it does not confirm that the payment has been completed or verified — please wait for webhooks to determine the final payment status. - Additionally, you can also provide a
callbackUrlto redirect the user after payment completion. If you provide acallbackUrl, the user will be redirected to that URL after payment completion with the payment status and other details in the query parameters. - If
callbackUrlis provided,failure and success events will not be triggered in the checkout instance.
  <button id="buy-button" class="buy-button">Buy Now</button>
  <script type="module">
    import { GlomoCheckoutApi } from 'https://glomopay-checkout-sdk.web.app/index.js';

    const checkout = new GlomoCheckoutApi({
      orderId: 'order_679a16457aP6K', // Pass the order_id received from the server in step 1
      publicKey: 'live_687b0151Bid24PAI', // Pass the public key received from the dashboard
      callbackUrl: 'https://yourwebsite.com/payment-result', // Optional: URL to redirect after payment completion
    });

    document.getElementById('buy-button').addEventListener('click', () => {
      checkout.open();
    });

    checkout.on('payment.success', function (response) {
      // Handle payment success
    });

  checkout.on('payment.failure', function (response) {
      // Handle payment failure
    });

    // Bank transfer only: emitted when the user submits their payment details.
    // Does NOT mean the payment is successful — await a webhook for confirmation.
    checkout.on('payment.bank_transfer_submitted', function (response) {
      // response.orderId - the order ID
      // response.senderAccountNumber - account number provided by the user
      // response.transactionReference - reference number provided by the user
    });

    // Handler for when the user closes the checkout popup without completing payment.
    // The checkout opens in a new popup window. When the user closes it, focus
    // returns to the parent page — use that signal combined with payment state tracking
    // to detect an abandoned checkout.
    let paymentCompleted = false;

    checkout.on('payment.success', function (response) {
      paymentCompleted = true;
      // Handle payment success
    });

    checkout.on('payment.failure', function (response) {
      paymentCompleted = true;
      // Handle payment failure
    });

    function onWindowFocus() {
      if (!paymentCompleted) {
        // User closed the checkout popup without completing payment.
        // Use this to restore your UI, log abandonment, or prompt the user to retry.
        console.log('Checkout closed without payment');
        window.removeEventListener('focus', onWindowFocus);
      }
    }

    document.getElementById('buy-button').addEventListener('click', () => {
      paymentCompleted = false; // Reset on each new checkout attempt
      checkout.open();
      window.addEventListener('focus', onWindowFocus);
    });
</script>When you provide a callbackUrl, the user will be automatically redirected to that URL after payment completion with the following parameters:
For successful payments:
https://yourwebsite.com/payment-result?status=success&orderId=123456&signature=abc123def456For failed payments:
https://yourwebsite.com/payment-result?status=failed&orderId=123456&signature=abc123def456This allows server-side handling of payment results in addition to the client-side event handlers.
3. Verify checkout response and signature in server
In the payment success handler, you will receive the payment object which will have the payment status along with payment_id and order_id.
Along with payment_id, order_id and status, we also return a signature. This signature is used to verify the authenticity of the payment object.
You can verify the signature by using the secret key provided by Glomo.
Success Response
{
    "payment_id": "payment_679a16457aP6K",
    "order_id": "order_679a16457aP6K",
    "status": "success",
    "signature": "701eab675aca32c14cd1e5e041842d11ee9d04e91a3aaa73c629664a336b2952"
}
You have to verify the signature by using the secret key provided by Glomo. Send the above response to your server, where you can verify the signature using the secret key provided by Glomo.
For verification, use the payment_id and status from success response and the order_id which was generated in step 1 instead of the one returned from checkout.
Generate signature using secret key and verify the generated signature with the signature received in the response.
In case of error response is an error object
Error Response
{
    "payment_id": "payment_679a16457aP6K",
    "order_id": "order_679a16457aP6K",
    "status": "failed",
    "error": {
        "code" : "INVALID_CARD",
        "message" : "Card not eligible for international payments"
    }
}
Sample Code to verify signature
PHP
<?php
function generate_signature($order_id, $payment_id, $status, $secret) {
    $data = $order_id . "|" . $payment_id . "|" . $status;
    return hash_hmac('sha256', $data, $secret);
}

// Example Usage
$order_id = "order_679a16457aP6K";
$payment_id = "payment_679a16457aP6K";
$status = "success";
$secret = "your_secret_key";

echo generate_signature($order_id, $payment_id, $status, $secret);
?>
Ruby
require 'openssl'

def generate_signature(order_id, payment_id, status, secret)
  data = "#{order_id}|#{payment_id}|#{status}"
  OpenSSL::HMAC.hexdigest("SHA256", secret, data)
end

# Example Usage
order_id = "order_679a16457aP6K"
payment_id = "payment_679a16457aP6K"
status = "success"
secret = "your_secret_key"

puts generate_signature(order_id, payment_id, status, secret)
Go
package main

import (
    "crypto/hmac"
    "crypto/sha256"
    "encoding/hex"
    "fmt"
)

func generateSignature(orderID, paymentID, status, secret string) string {
    data := orderID + "|" + paymentID + "|" + status
    h := hmac.New(sha256.New, []byte(secret))
    h.Write([]byte(data))
    return hex.EncodeToString(h.Sum(nil))
}

func main() {
    orderID := "order_679a16457aP6K"
    paymentID := "payment_679a16457aP6K"
    status := "success"
    secret := "your_secret_key"

    fmt.Println(generateSignature(orderID, paymentID, status, secret))
}
Javascript(Node.js)
const crypto = require('crypto');

function generateSignature(orderId, paymentId, status, secret) {
    const data = `${orderId}|${paymentId}|${status}`;
    return crypto.createHmac('sha256', secret).update(data).digest('hex');
}

// Example Usage
const orderId = "order_679a16457aP6K";
const paymentId = "payment_679a16457aP6K";
const status = "success";
const secret = "your_secret_key";

console.log(generateSignature(orderId, paymentId, status, secret));
Python
import hmac
import hashlib

def generate_signature(order_id, payment_id, status, secret):
    data = f"{order_id}|{payment_id}|{status}".encode()
    return hmac.new(secret.encode(), data, hashlib.sha256).hexdigest()

# Example Usage
order_id = "order_679a16457aP6K"
payment_id = "payment_679a16457aP6K"
status = "success"
secret = "your_secret_key"

print(generate_signature(order_id, payment_id, status, secret))
4. Verify Payment status
Payment's status can be tracked via following ways
- You can track the payments linked to your order_id via dashboard
- You can also track the payment status via polling Payment APIs
- You can also track the payment status via Webhooks which will notify you about the payment status.
Symptom: The checkout works perfectly in your local development environment, but when deployed to UAT or production, the payment page fails to open in a new tab/popup after clicking the "Pay Now" button.
Cause: This issue is typically caused by the Cross-Origin-Opener-Policy (COOP) security header on your website. If your website sends Cross-Origin-Opener-Policy: same-origin, it will block popups to external domains, including the Glomo payment gateway.
- Open your browser's Developer Tools (F12 or Right-click → Inspect)
- Go to the Network tab
- Reload your page and click on the main document (usually the first entry)
- Look at the Response Headers section
- Check if you see:
Cross-Origin-Opener-Policy: same-origin
If you see this header with the same-origin value, this is what's blocking the checkout popup.
Update your server's COOP header configuration from:
Cross-Origin-Opener-Policy: same-originto:
Cross-Origin-Opener-Policy: same-origin-allow-popupsHow to implement this depends on your setup:
Apache (.htaccess)
Header set Cross-Origin-Opener-Policy "same-origin-allow-popups"Nginx
add_header Cross-Origin-Opener-Policy "same-origin-allow-popups";Node.js/Express
app.use((req, res, next) => {
  res.setHeader('Cross-Origin-Opener-Policy', 'same-origin-allow-popups');
  next();
});
Next.js (next.config.js)
module.exports = {
  async headers() {
    return [
      {
        source: '/(.*)',
        headers: [
          {
            key: 'Cross-Origin-Opener-Policy',
            value: 'same-origin-allow-popups',
          },
        ],
      },
    ];
  },
};After deploying the header change:
- Clear your browser cache (or use incognito/private mode)
- Reload your website
- Open Developer Tools → Network tab
- Verify the header now shows:
Cross-Origin-Opener-Policy: same-origin-allow-popups - Test the checkout flow again
Note: The same-origin-allow-popups value maintains security for your website while allowing the checkout to open properly in a new window.
Symptom: After successfully opening the checkout, you see a CORS (Cross-Origin Resource Sharing) error in the browser console when the checkout tries to load. The error typically mentions the preferences API call failing with a message like:
Access to fetch at 'https://...' from origin '...' has been blocked by CORS policyCause: This issue is often caused by browser extensions that intercept or modify network requests. Common culprits include ad blockers, privacy extensions, VPN extensions, and other security-focused browser add-ons.
- Open your browser's Developer Tools (F12)
- Go to the Console tab
- Load the checkout and look for CORS-related errors
- The error will typically mention "blocked by CORS policy" or "No 'Access-Control-Allow-Origin' header"
Step 1: Test in Incognito/Private Mode
The quickest way to verify if a browser extension is causing the issue:
- Open an incognito/private browsing window (most extensions are disabled by default)
- Test the checkout integration again
- If the checkout works in incognito mode, a browser extension is the culprit
Step 2: Identify and Disable Interfering Extensions
If the checkout works in incognito mode:
- Go to your browser's extensions page:
- Chrome/Edge:
chrome://extensionsoredge://extensions - Firefox:
about:addons - Safari: Preferences → Extensions
- Chrome/Edge:
- Disable extensions one by one, especially:
- Ad blockers (AdBlock, uBlock Origin, etc.)
- Privacy extensions (Privacy Badger, Ghostery, etc.)
- VPN or proxy extensions
- Security extensions
- Request interceptors or modifiers
- Test the checkout after disabling each extension
- Once you identify the problematic extension, keep it disabled for your domain or whitelist your website
If your customers report this issue, provide them with these troubleshooting steps:
- Try testing in incognito/private browsing mode
- If it works there, ask them to temporarily disable browser extensions
- Common extensions that cause issues: ad blockers, VPN extensions, privacy tools
Note: This is not an issue with Glomo's checkout or your integration - it's a side effect of browser extensions modifying network behavior. The checkout will work correctly once interfering extensions are identified and configured properly.
Symptom: When attempting to load the Glomo Checkout, you see a message stating "This content is blocked. Contact the site owner to fix the issue." The checkout iframe or SDK scripts fail to load.
Cause: Your website has Content Security Policy (CSP) headers configured that are blocking the Glomo Checkout SDK from loading its scripts, iframe, and making API calls. CSP is a security feature that restricts which external resources can be loaded on your page.
- Open your browser's Developer Tools (F12 or Right-click → Inspect)
- Go to the Console tab
- Look for errors mentioning "Content Security Policy" or "CSP", such as:
Refused to load the script 'https://glomopay-checkout-sdk.web.app/...' because it violates the following Content Security Policy directive...Refused to frame 'https://glomopay-checkout-sdk.web.app/' because it violates the following Content Security Policy directive... - You can also check the Network tab → click on your page's main document → Response Headers → look for
Content-Security-Policyheader
Update your CSP configuration to allow the Glomo Checkout SDK domains. You need to add the following domains to your CSP directives:
| Domain | Purpose |
|---|---|
https://glomopay-checkout-sdk.web.app | SDK scripts, iframe, and source maps |
https://*.glomopay.com | Checkout modal and API calls |
Add these domains to the following CSP directives:
script-src: Allows loading the SDK JavaScriptframe-src: Allows embedding the checkout iframeconnect-src: Allows API calls to Glomo services
How to implement this depends on your setup:
Apache (.htaccess)
Header set Content-Security-Policy "default-src 'self'; script-src 'self' 'unsafe-inline' https://glomopay-checkout-sdk.web.app; frame-src 'self' https://glomopay-checkout-sdk.web.app https://*.glomopay.com; connect-src 'self' https://glomopay-checkout-sdk.web.app https://*.glomopay.com; style-src 'self' 'unsafe-inline';"Nginx
add_header Content-Security-Policy "default-src 'self'; script-src 'self' 'unsafe-inline' https://glomopay-checkout-sdk.web.app; frame-src 'self' https://glomopay-checkout-sdk.web.app https://*.glomopay.com; connect-src 'self' https://glomopay-checkout-sdk.web.app https://*.glomopay.com; style-src 'self' 'unsafe-inline';";Node.js/Express
app.use((req, res, next) => {
  res.setHeader(
    'Content-Security-Policy',
    "default-src 'self'; " +
      "script-src 'self' 'unsafe-inline' https://glomopay-checkout-sdk.web.app; " +
      "frame-src 'self' https://glomopay-checkout-sdk.web.app https://*.glomopay.com; " +
      "connect-src 'self' https://glomopay-checkout-sdk.web.app https://*.glomopay.com; " +
      "style-src 'self' 'unsafe-inline';",
  );
  next();
});
Next.js (next.config.js)
module.exports = {
  async headers() {
    return [
      {
        source: '/(.*)',
        headers: [
          {
            key: 'Content-Security-Policy',
            value:
              "default-src 'self'; script-src 'self' 'unsafe-inline' https://glomopay-checkout-sdk.web.app; frame-src 'self' https://glomopay-checkout-sdk.web.app https://*.glomopay.com; connect-src 'self' https://glomopay-checkout-sdk.web.app https://*.glomopay.com; style-src 'self' 'unsafe-inline';",
          },
        ],
      },
    ];
  },
};
ASP.NET Core (C#)
Add this middleware in Program.cs (or Startup.cs):
app.Use(async (context, next) =>
{
    context.Response.Headers.Append("Content-Security-Policy",
        "default-src 'self'; " +
        "script-src 'self' 'unsafe-inline' https://glomopay-checkout-sdk.web.app; " +
        "frame-src 'self' https://glomopay-checkout-sdk.web.app https://*.glomopay.com; " +
        "connect-src 'self' https://glomopay-checkout-sdk.web.app https://*.glomopay.com; " +
        "style-src 'self' 'unsafe-inline';");
    await next();
});
For IIS, you can add these headers in web.config:
<configuration>
  <system.webServer>
    <httpProtocol>
      <customHeaders>
        <add name="Content-Security-Policy" value="default-src 'self'; script-src 'self' 'unsafe-inline' https://glomopay-checkout-sdk.web.app; frame-src 'self' https://glomopay-checkout-sdk.web.app https://*.glomopay.com; connect-src 'self' https://glomopay-checkout-sdk.web.app https://*.glomopay.com; style-src 'self' 'unsafe-inline';" />
      </customHeaders>
    </httpProtocol>
  </system.webServer>
</configuration>
Django (Python)
Using django-csp middleware:
# settings.py
CSP_DEFAULT_SRC = ("'self'",)
CSP_SCRIPT_SRC = ("'self'", "'unsafe-inline'", "https://glomopay-checkout-sdk.web.app")
CSP_FRAME_SRC = ("'self'", "https://glomopay-checkout-sdk.web.app", "https://*.glomopay.com")
CSP_CONNECT_SRC = ("'self'", "https://glomopay-checkout-sdk.web.app", "https://*.glomopay.com")
CSP_STYLE_SRC = ("'self'", "'unsafe-inline'")
Or using custom middleware:
class CSPMiddleware:
    def __init__(self, get_response):
        self.get_response = get_response

    def __call__(self, request):
        response = self.get_response(request)
        response['Content-Security-Policy'] = (
            "default-src 'self'; "
            "script-src 'self' 'unsafe-inline' https://glomopay-checkout-sdk.web.app; "
            "frame-src 'self' https://glomopay-checkout-sdk.web.app https://*.glomopay.com; "
            "connect-src 'self' https://glomopay-checkout-sdk.web.app https://*.glomopay.com; "
            "style-src 'self' 'unsafe-inline';"
        )
        return response
Ruby on Rails
Using secure_headers gem:
# config/initializers/secure_headers.rb
SecureHeaders::Configuration.default do |config|
  config.csp = {
    default_src: %w('self'),
    script_src: %w('self' 'unsafe-inline' https://glomopay-checkout-sdk.web.app),
    frame_src: %w('self' https://glomopay-checkout-sdk.web.app https://*.glomopay.com),
    connect_src: %w('self' https://glomopay-checkout-sdk.web.app https://*.glomopay.com),
    style_src: %w('self' 'unsafe-inline')
  }
end
Or using custom middleware:
# config/application.rb
config.middleware.insert_before 0, Rack::Headers do |headers|
  headers['Content-Security-Policy'] = "default-src 'self'; script-src 'self' 'unsafe-inline' https://glomopay-checkout-sdk.web.app; frame-src 'self' https://glomopay-checkout-sdk.web.app https://*.glomopay.com; connect-src 'self' https://glomopay-checkout-sdk.web.app https://*.glomopay.com; style-src 'self' 'unsafe-inline';"
endAfter deploying the CSP changes:
- Clear your browser cache (or use incognito/private mode)
- Reload your website
- Open Developer Tools → Console tab
- Verify there are no CSP-related errors
- Check Network tab → Response Headers to confirm your CSP now includes the Glomo domains
- Test the checkout flow again
Note: If you have an existing CSP policy, you only need to add the Glomo domains to your existing directives rather than replacing your entire policy. Make sure to merge these domains with your current configuration.