The sequence diagram below represents the interactions between the investor, broker, Glomo API and Glomo Web SDK.
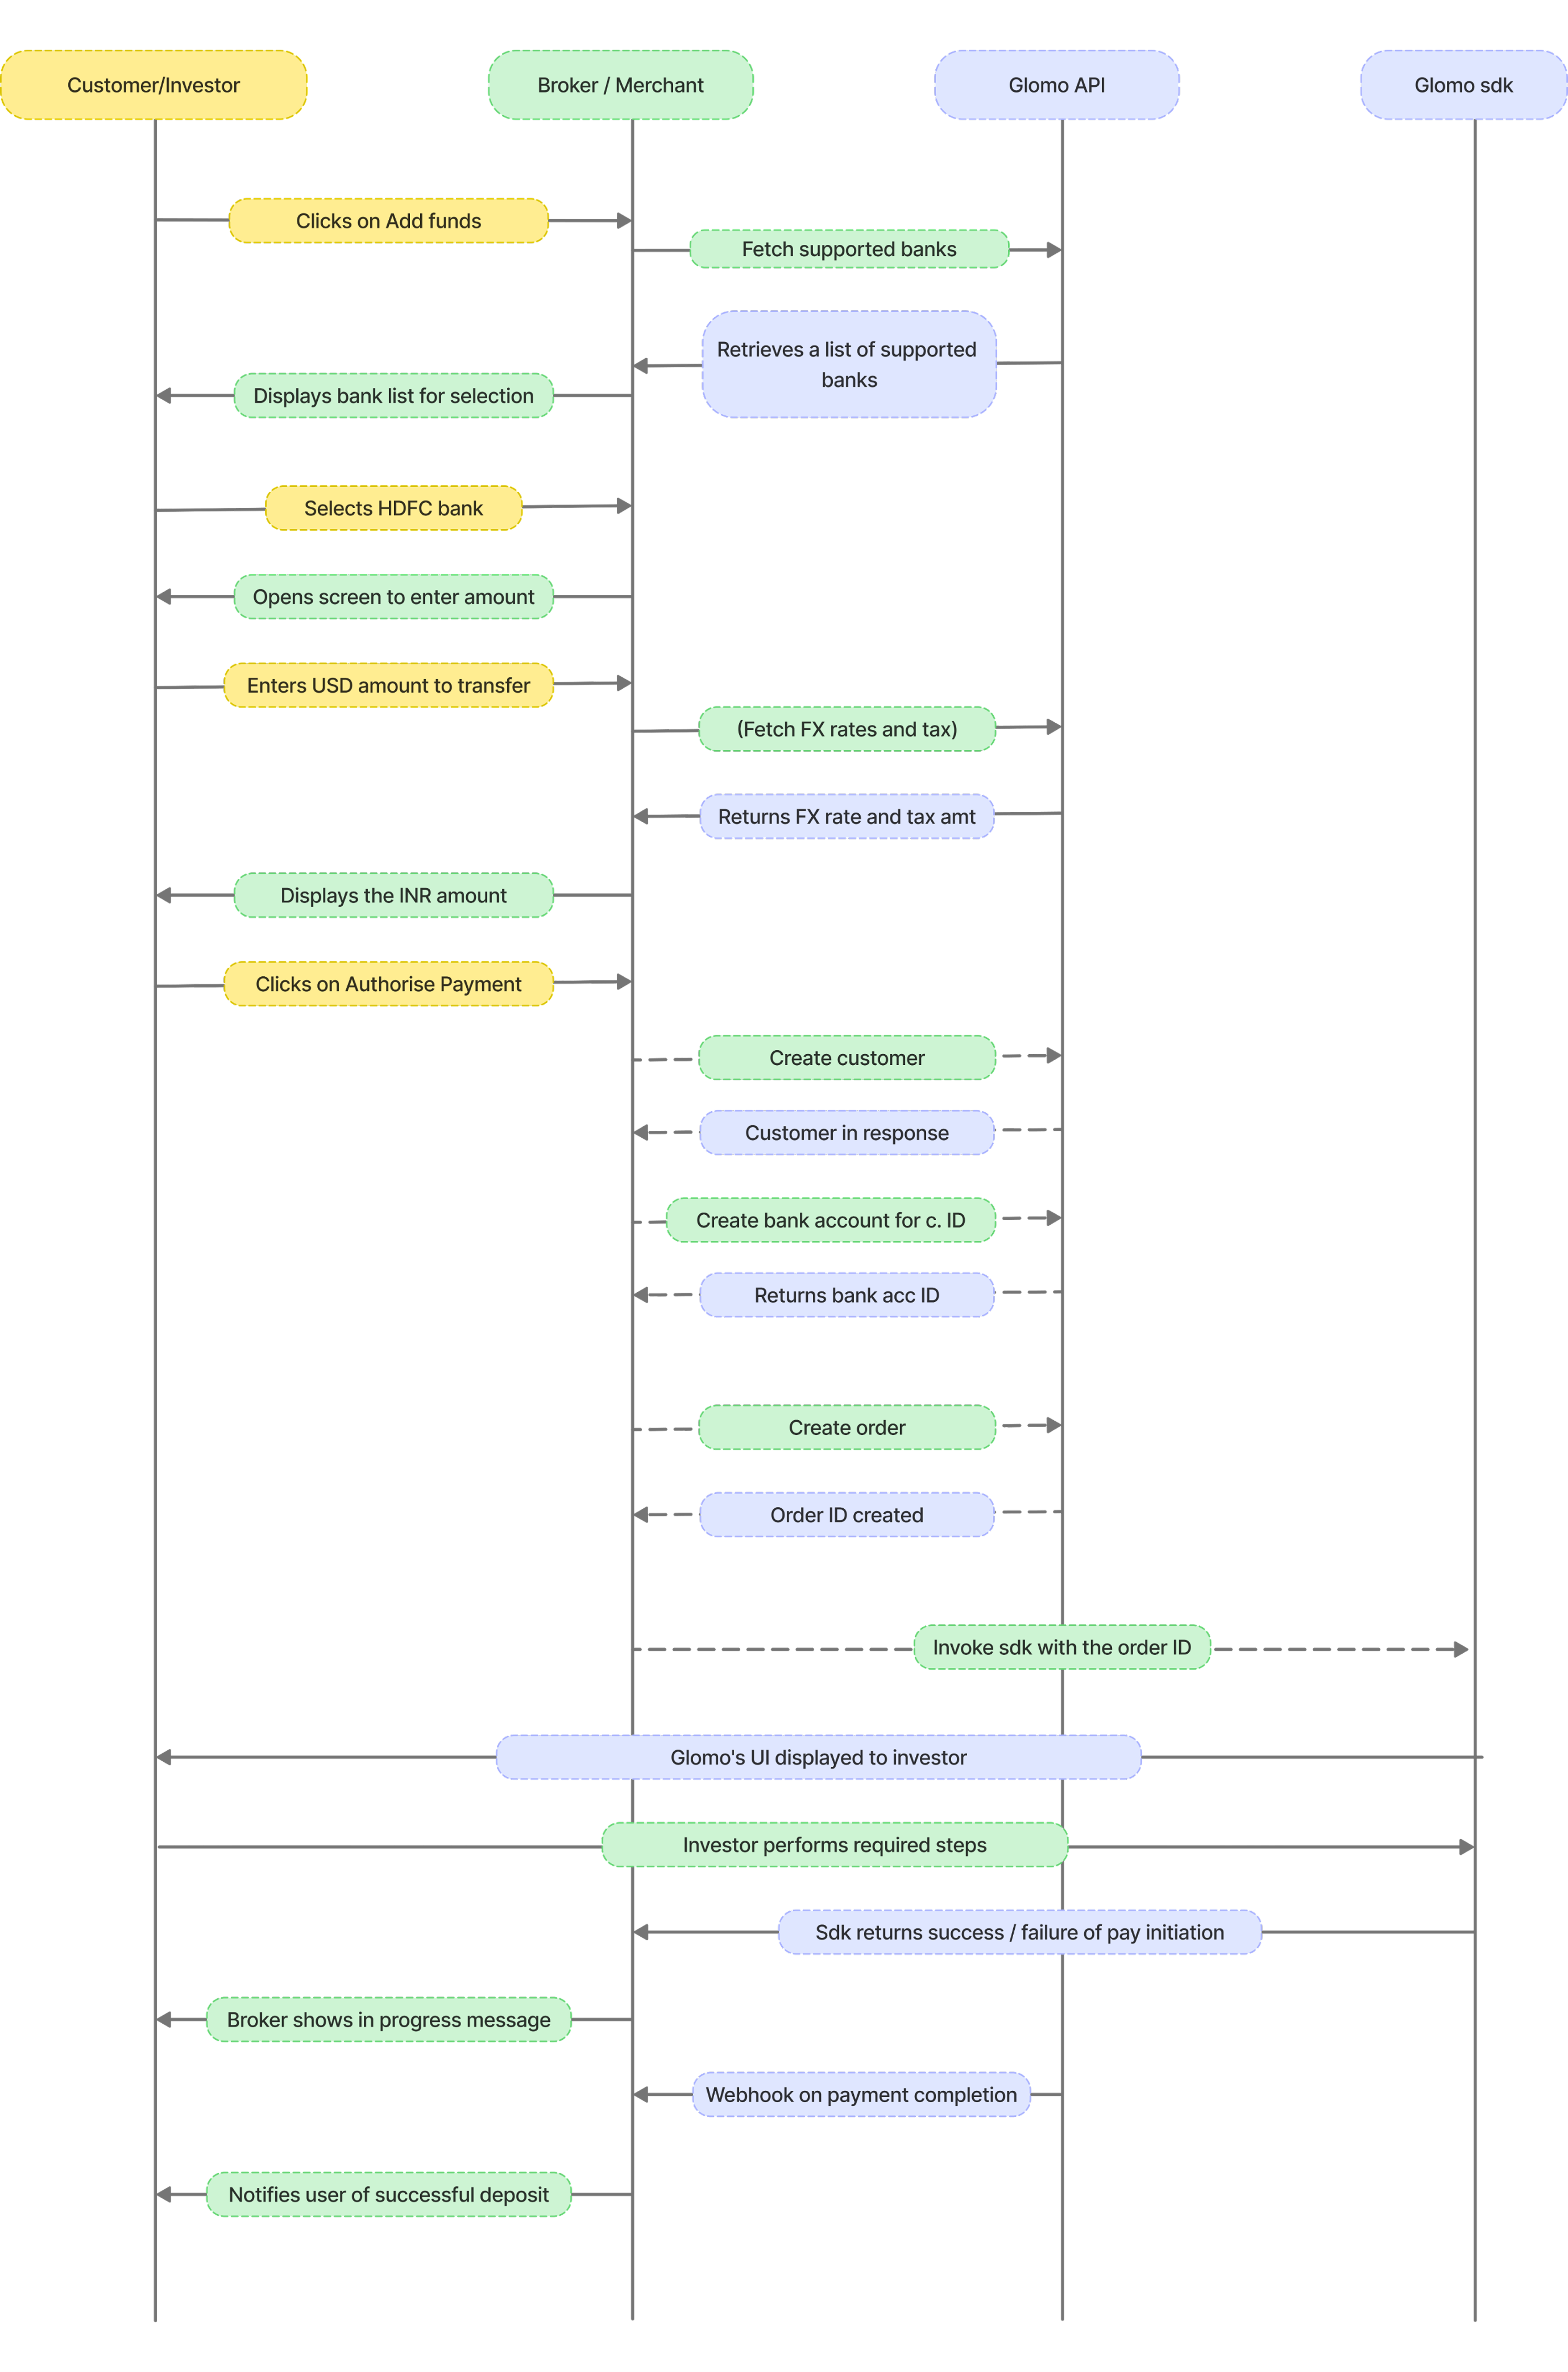
Below are the steps to integrate the Glomo APIs and Web SDK to enable remittance of funds from investors
Fetch the list of banks supported on the remittance flow using this API.
GET https://api.glomopay.com/api/v1/lrs/bankscurl -i -X GET \
https://api.glomopay.com/api/v1/lrs/banks \
-H 'Authorization: Bearer <YOUR_JWT_HERE>' \
-H 'Content-Type: application/json'[
{ bank_name: 'HDFC bank', bank_code: 'hdfc' },
{ bank_name: 'Axis bank', bank_code: 'axis' },
{ bank_name: 'ICICI Bank', bank_code: 'icici' }
]Create a customer entity in Glomo’s system by adding the customer details such as contact details, name and address.
Note: Call this API when the investor adds funds for the first time. Store the
customer_idreceived in the response and reuse it for the investor’s return journey.By default, customer uniqueness is enforced on email. On request, this can instead be enforced on PAN (
kyc.pan_number) in place of email, so investors are de-duplicated by PAN even if they use different emails. This is off by default — to enable PAN-based uniqueness for your account, reach out to support@glomopay.com.
POST https://api.glomopay.com/api/v1/customercurl -i -X POST \
https://api.glomopay.com/api/v1/customer \
-H 'Authorization: Bearer <YOUR_JWT_HERE>' \
-H 'Content-Type: application/json' \
-d '{
"name": "Prakhar",
"customer_type": "individual",
"email": "customer51@glomopay.com",
"phone": "7047500604",
"dob": "1990-01-01",
"address": "123 Main St",
"city": "Anytown",
"state": "Anystate",
"country": "Ind",
"pincode": "560048",
"kyc": {
"pan_number": "IXQPK8942E"
}
}'{
"id": "cust_68468bfcxaGo2",
"name": "Prakhar",
"customer_type": "individual",
"email": "customer51@glomopay.com",
"phone": "7047500604",
"address": "123 Main St",
"city": "Anytown",
"state": "Anystate",
"country": "IND",
"pincode": "560048",
"status": "active",
"created_at": "2025-06-09T07:23:40.598Z",
"updated_at": "2025-06-09T07:23:40.598Z",
"kyc": {
"pan_number": "IXQPK8942E"
}
}Create a bank account entity in Glomo’s system by adding the bank account information of the remitter.
Note: Call this API when the investor adds funds for the first time. Store the
acclrs_idreceived in the response and reuse it for the investor’s return journey.The
idreturned in the API response should be passed as a value ofbank_account_idin the Create an Order API request.
bank_customer_id: Required only for HDFC. If not provided, the checkout will prompt the customer to enter this value during the payment flow.
POST https://api.glomopay.com/api/v1/customer/{customer_id}/bank_accountcurl -i -X POST \
https://api.glomopay.com/api/v1/customer/cust_6a32c060alkNC/bank_account \
-H 'Authorization: Bearer <YOUR_JWT_HERE>' \
-H 'Content-Type: application/json' \
-d '{
"bank_code": "hdfc",
"account_number": "50100114810291",
"bank_customer_id": "901008282"
}'{
"id": "acclrs_68468c03g9xt7",
"bank_code": "hdfc",
"account_number": "50100114810291",
"bank_customer_id": "901008282"
}Use Case: In case the customer has provided an incorrect Bank Customer ID in the Create a Bank Account API, call this API endpoint to update the Bank Customer ID in Glomo.
PATCH https://api.glomopay.com/api/v1/customer/{customer_id}/bank_account/{bank_account_id}curl --location --request PATCH 'https://api.glomopay.com/api/v1/customer/cust_6a32c060alkNC/bank_account/acclrs_6a32c072d5DSO' \
--header 'Content-Type: application/json' \
--header 'Authorization: Bearer <YOUR_JWT_HERE>' \
--data '{
"bank_customer_id": "900500695"
}'{
"id": "acclrs_69f88762wZUNB",
"bank_code": "hdfc",
"account_number": "50100114810292",
"bank_customer_id": "9010082857"
}Create a Beneficiary entity in Glomo by providing the receiver’s bank account details. This entity is required when beneficiaries are dynamic (i.e., a different beneficiary per end-user of the broker/fund, or per transaction) and should be created via API.
If there is one fixed beneficiary shared across all users, you do not need to create a Beneficiary per user in Glomo. In this scenario, the beneficiary can be configured once in the Glomo’s backend system and reused for all transactions.
Note: For LRS beneficiaries, the
intermediate_bank.swift_codefield is required. This is the SWIFT/BIC code of the correspondent/intermediary bank used to route the remittance.
POST https://api.glomopay.com/api/v2/beneficiariescurl -i -X POST \
https://api.glomopay.com/api/v2/beneficiaries \
-H 'Authorization: Bearer <YOUR_JWT_HERE>' \
-H 'Content-Type: application/json' \
-d '{
"category": "lrs",
"beneficiary": {
"name": "ACME Corporation",
"type": "business",
"email": "finance@acme.com",
"phone": "+1-555-123-4567",
"nickname": "ACME Primary Account",
"address": {
"address_line1": "123 Business Park",
"address_line2": "Suite 100",
"city": "New York",
"state": "NY",
"country_code": "USA",
"postal_code": "10001"
}
},
"bank_account": {
"account_number": "1234567890",
"name": "Citibank NA",
"swift_code": "CITIUS33",
"local_routing_number": "021000089",
"currency": "USD",
"address": {
"address_line1": "388 Greenwich Street",
"city": "New York",
"state": "NY",
"country_code": "USA",
"postal_code": "10013"
},
"intermediate_bank": {
"name": "JPMorgan Chase Bank",
"country": "USA",
"swift_code": "CHASUS33",
"account_number": "123456789"
}
}
}'{
"id": "ben_5JU9yv0lGSUP",
"name": "ACME Corporation",
"type": "business",
"category": "lrs",
"email": "finance@acme.com",
"phone": "+1-555-123-4567",
"nickname": "ACME Primary Account",
"created_at": "2025-01-15T10:00:00Z",
"updated_at": "2025-01-15T10:00:00Z",
"address": {
"address_line1": "123 Business Park",
"address_line2": "Suite 100",
"city": "New York",
"state": "NY",
"country_code": "USA",
"postal_code": "10001"
},
"bank_account": {
"account_number": "1234567890",
"name": "Citibank NA",
"swift_code": "CITIUS33",
"local_routing_number": "021000089",
"currency": "USD",
"address": {
"address_line1": "388 Greenwich Street",
"city": "New York",
"state": "NY",
"country_code": "USA",
"postal_code": "10013"
},
"intermediate_bank": {
"name": "JPMorgan Chase Bank",
"country": "USA",
"swift_code": "CHASUS33",
"account_number": "123456789"
}
}
}Create a quote from the server by passing the amount to be remitted and the bank of the customer. Using this API you can display FX rate, tax and net USD to your user before proceeding. Please note that all currency fields are represented in minor units (e.g., cents, paisa, or equivalent subunits).
Note: The
quote_idgenerated from this API is valid for 30 minutes from the time of creation. The displayed exchange rate is indicative. Actual exchange rate and final INR debit (incl. GST & TCS) are set by the banking partner.
POST https://api.glomopay.com/api/v1/lrs/quotescurl -i -X POST \
https://api.glomopay.com/api/v1/lrs/quotes \
-H 'Authorization: Bearer <YOUR_JWT_HERE>' \
-H 'Content-Type: application/json' \
-d '{
"bank_code": "hdfc",
"source_amount": 100000,
"source_currency": "INR",
"target_currency": "USD"
}'{
"id": "quote_7575757",
"from": {
"amount": 100000,
"currency": "INR"
},
"to": {
"amount": 1028,
"currency": "USD"
},
"fx_rate": "0.011424",
"bank_code": "hdfc",
"total_tax": "10.0",
"expires_at": "2025-06-10T09:32:04.107Z",
"created_at": "2025-06-09T09:32:04.113Z"
}Initiate the payment process by creating an order from your server using your secret API keys and the previously created quote ID.
- The
idreturned in the API response should be passed to the web sdk. This ensures the payment is securely linked to the correct order and prevents tampering. - The Order API accepts amounts in USD, with the value expressed in cents.
remittance_informationis a reference string that helps identify the purpose of the remittance. It cannot be empty, must contain only alphanumeric characters and hyphens (a–z, A–Z, 0–9, -), with no spaces or special characters, and must not exceed 20 characters in length.
POST https://api.glomopay.com/api/v1/orderscurl -i -X POST \
https://api.glomopay.com/api/v1/orders \
-H 'Authorization: Bearer <YOUR_JWT_HERE>' \
-H 'Content-Type: application/json' \
-d '{
"customer_id": "cust_68468bfcxaGo2",
"currency": "USD",
"amount": 100000,
"invoice_number": "RG12FF590",
"notes": {
"key1": "some note"
},
"lrs": {
"lrs_quote_id": "quote_69e0b88cAXRMu",
"remittance_information": "REF12345",
"bank_account_id": "acclrs_68468c03g9xt7",
"beneficiary_id": "benef_68468c03g9xua"
}
}'{
"id": "order_68468c15mnYzq",
"customer_id": "cust_68468bfcxaGo2",
"document_id": null,
"status": "active",
"currency": "USD",
"amount": 100000,
"remaining_amount": 100000,
"already_paid_amount": 0,
"purpose_code": null,
"invoice_amount": null,
"invoice_description": null,
"invoice_number": null,
"notes": {
"key1": "some note"
},
"expires_at": "2025-09-09T07:24:05.074Z",
"created_at": "2025-06-09T07:24:05Z",
"updated_at": "2025-06-09T07:24:08Z",
"lrs": {
"lrs_quote_id": "quote_69e0b88cAXRMu",
"remittance_information": "REF12345",
"bank_account_id": "acclrs_68468c03g9xt7",
"beneficiary_id": "benef_68468c03g9xua"
}
}Integrate an “Add Funds” button into your client-side interface.
- Add the provided code snippet to your website or app to launch Glomo’s sdk.
- When the user clicks the button, the checkout form will open, using the
order_idcreated using above API. - Handle payment initiation success and failure events using the provided handler functions.
- On payment completion, you’ll receive either a payment object (on successful authorisation by the user) or an error object (on failure).
- Send this information back to your server for order fulfillment or to trigger a retry if the payment failed.
<!DOCTYPE html>
<html>
<head>
    <title>GlomoPay Checkout Integration</title>
</head>
<body>
    <button id="pay-button">Pay with GlomoPay</button>

    <script type="module">
        import { LrsCheckoutApi } from 'https://lrs-checkout-sdk-prod.web.app/index.js';

        document.getElementById('pay-button').addEventListener('click', async () => {
            try {
                // Initialize the checkout
                const lrsCheckout = new LrsCheckoutApi({
                    publicKey: 'your-public-key-here',
                    orderId: 'unique-order-id-123',
                });

                // Handle payment success
                lrsCheckout.on('payment.success', (data) => {
                    console.log('Payment successful:', data);
                    // Handle successful payment
                    window.location.href = '/payment-success';
                });

                // Handle payment failure
                lrsCheckout.on('payment.failure', (data) => {
                    console.log('Payment failed:', data);
                    // Handle failed payment
                    alert('Payment failed. Please try again.');
                });

                // Handle checkout close
                lrsCheckout.on('close', () => {
                    console.log('Checkout closed by user');
                    // Handle checkout modal close
                });

                // Open the checkout modal
                await lrsCheckout.open();

            } catch (error) {
                console.error('Checkout error:', error);
                alert('Unable to open checkout. Please try again.');
            }
        });
    </script>
</body>
</html>The process to verify the signature can be found here.
Payment status can be tracked via the following ways
- Dashboard Monitoring: View real-time updates for all payments in the Glomo merchant dashboard.
- Payment API Polling: Programmatically check payment status using Glomo’s Payment APIs.
- Webhook Notification: Get instant notifications on payment status changes directly to your server.
If a payment journey has been completed from the checkout, the payment will appear as “In Progress” on the dashboard in the Sandbox environment.
To complete the payment journey and mark the payment as Success:
- Log in to the Dashboard
- Open the Payment Details page for the relevant payment
- Click on Update Status on the right side of the screen
- Select “Success” and click on Confirm
This action simulates the final success state of the payment.
- In production, payment success is updated automatically once Glomopay receives confirmation from the bank.
- In the sandbox environment, there is no real bank confirmation.
- To allow merchants to test and mimic the complete payment lifecycle, Glomopay provides a manual status update option.
For answers to common integration questions, see the FAQ.